- August 28, 2025
- Mins Read


FOLDING CELL
Expanding content cell with animation inspired by folding paper card material design.
We specialize in the designing and coding of custom UI for Mobile Apps and Websites.
![]()
Stay tuned for the latest updates:
Requirements
- iOS 8.0+
- Xcode 10.2
Installation
Just add the FoldingCell.swift file to your project.
or use CocoaPods with Podfile:
pod ‘FoldingCell’
or Carthage users can simply add Mantle to their Cartfile:
github “Ramotion/folding-cell”
or Swift Package Manager by adding:
                                                dependencies: [

.package(url: “https://github.com/Ramotion/folding-cell.git”, from: “5.0.2”)

]
to Package.swift
or just drag and drop FoldingCell.swift file to your project
Solution

Usage
-
Create a new cell inheriting from
FoldingCell -
Add a UIView to your cell in your storyboard or nib file, inheriting from
RotatedView. Connect the outlet from this view to the cell propertyforegroundView. Add constraints from this view to the superview, as in this picture:
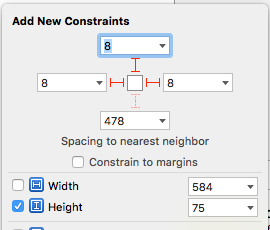
(constants of constraints may be different). Connect the outlet from this top constraint to the cell property foregroundViewTop . (This view will be shown when the cell is in its normal state).
- Add other UIViews to your cell, connect the outlet from this view to the cell property
containerView. Add constraints from this view to the superview like in the picture:
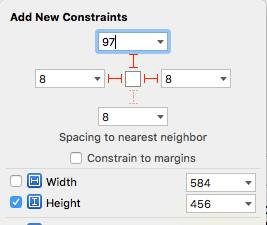
(constants of constraints may be different). Connect the outlet from this top constraint to the cell property containerViewTop. (This view will be shown when the cell is opened)
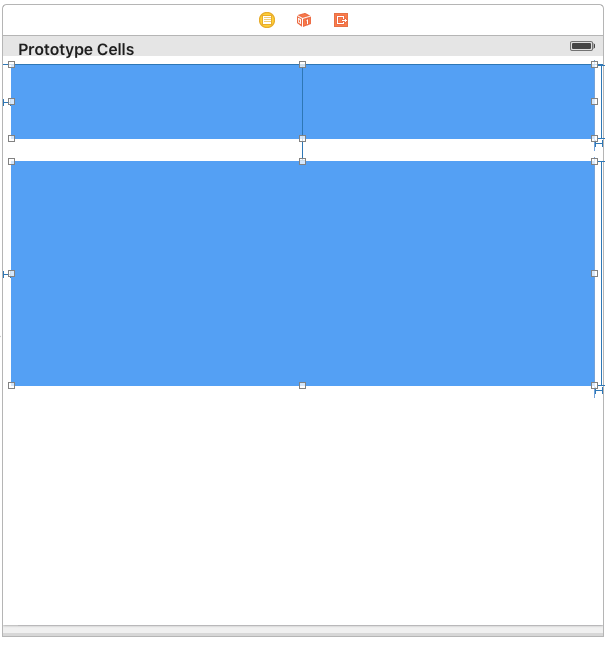
Your result should be something like this picture:
- Set
@IBInspectable var itemCount: NSIntegerproperty is a count of folding (it IBInspectable you can set in storyboard). range 2 or greater. Default value is 2
Ok, we’ve finished configuring the cell.
- Adding code to your UITableViewController
5.1) Add constants:
                                                fileprivate struct C {

struct CellHeight {

static let close: CGFloat = *** // equal or greater foregroundView height

static let open: CGFloat = *** // equal or greater containerView height

}

}
5.2) Add property for calculate cells height
var cellHeights = (0..<CELLCOUNT).map { _ in C.CellHeight.close }
5.3) Override method:
                                                override func tableView(tableView: UITableView, heightForRowAtIndexPath indexPath: NSIndexPath) -> CGFloat {

return cellHeights[indexPath.row]

}
5.4) Added code to method:
                                                override func tableView(tableView: UITableView, didSelectRowAtIndexPath indexPath: NSIndexPath) {

guard case let cell as FoldingCell = tableView.cellForRowAtIndexPath(indexPath) else {

return

}
var duration = 0.0

if cellIsCollapsed {

cellHeights[indexPath.row] = Const.openCellHeight

cell.unfold(true, animated: true, completion: nil)

duration = 0.5

} else {

cellHeights[indexPath.row] = Const.closeCellHeight

cell.unfold(false, animated: true, completion: nil)

duration = 0.8

}
UIView.animateWithDuration(duration, delay: 0, options: .CurveEaseOut, animations: { _ in

tableView.beginUpdates()

tableView.endUpdates()

}, completion: nil)

}
5.5) Control if the cell is open or closed
                                                override func tableView(tableView: UITableView, willDisplayCell cell: UITableViewCell, forRowAtIndexPath indexPath: NSIndexPath) {
if case let cell as FoldingCell = cell {

if cellHeights![indexPath.row] == C.cellHeights.close {

foldingCell.selectedAnimation(false, animated: false, completion:nil)

} else {

foldingCell.selectedAnimation(true, animated: false, completion: nil)

}

}

}
- Add this code to your new cell class
                                                override func animationDuration(itemIndex:NSInteger, type:AnimationType)-> NSTimeInterval {
// durations count equal it itemCount

let durations = [0.33, 0.26, 0.26] // timing animation for each view

return durations[itemIndex]

}
if don’t use storyboard and xib files
Create foregroundView and containerView from code (steps 2 – 3) look example: Folding-cell-programmatically
GitHub
#animation #autolayout #cocoa #cocoapod #cocoapods #cocoatouch #collection #collectionkit #collectionview #collectionviewcell #collectionviewlayout #customlayout #dynamic #expandabletableview #flowlayout #hashtag #hashtags #ibinspectable #instagram #instagramanimation #ios #iosanimation #iosdevelopment #iossdk #iosswift #iosthirdparty #library #lightboxalgorithm #materialdesign #objectivec #swift #swiftanimation #swiftcollection #swiftimage #swiftlibrary #swiftpackagemanager #swiftui #swiftuicomponents #table #tableview #tableviewcell #taglistview #tags #tagsview #uicocoapods #uicollectionview #uicollectionviewanimation #uicollectionviewcell #uicollectionviewflowlayout #uicollectionviewlayout #uitableview #uitableviewcell #uitableviewcontroller #xcode
YOU MIGHT ALSO LIKE...

- August 27, 2025
- SwiftUI
This package provides you with an easy way to show tooltips over any SwiftUI view, since Apple does not provide ...
- August 27, 2025
- SwiftUI
- Uncategorized
SimpleToast is a simple, lightweight, flexible and easy to use library to show toasts / popup notifications inside iOS or ...
- August 27, 2025
- SwiftUI
Create Toast Views with Minimal Effort in SwiftUI Using SSToastMessage. SSToastMessage enables you to effortlessly add toast notifications, alerts, and ...

- August 27, 2025
- Mins Read
- August 27, 2025
- Mins Read
- August 27, 2025
- Mins Read
- August 22, 2025
- Mins Read
