- August 28, 2025
- Mins Read
A simple yet powerful library to build form for your class models.

Motivations
I found most form libraries for swift are too complicated to bootstrap a simple project. So I write ObjectForm to make it dead simple for building forms and binding model classes.
ObjectForm doesn’t fight with you to write UIKit code. By design, it is simple to understand and extend. If you follow the example project carefully, you would find it easy to fit in your Swift project.
This project has no dependency of any other library.
Application
In my application (a personal finance app), I use ObjectForm to make forms for multiple classes as well as different variants for the same class, which saves me from writing duplicate code.

Features
- Bind class model to form rows
- Automatic keyboards types according to model types
- Form rows are type safe
- Fully customizable form validation rules
- A list of built-in UITableViewCell to support multiple types
- Work amazingly well with your UITableView code
Requirements
- iOS >= 11.0
Usage
- Copy sources
- Copy files under /Sources into your project.
- Carthage (Coming soon)
- Swift Package Manager
- Click “Files -> Swift Package Manager -> Add Package Dependency…” in Xcode’s menu
- Search “https://github.com/haojianzong/ObjectForm“.
- Select “master” branch or input “Next major version”
Available Rows & Cells
Rows
StringRow: Row to support string input, full keyboardDoubleRow: Row to support number input, numeric keyboardDecimalRow: Row to support number input, numeric keyboard, with NSDecimalNumber typeDateRow: Row to bind Date value
Cells
TextViewInputCell: text input cellSelectInputCell: support selection, provided byCollectionPickerTextViewVC: A view controller with UITextView to input long textButtonCell: Show a button in the formTypedInputCell: Generic cell to support type bindingFormInputCell: The base class for all cells
Tutorials
You can follow ObjectFormExample in ObjectFormExample to learn how to build a simple form with a class model.
Binding Model to Form
class FruitFormData: NSObject, FormDataSource {
// Bind your custom model
typealias BindModel = Fruit
var basicRows: [BaseRow] = []
func numberOfSections() -> Int {…}
func numberOfRows(at section: Int) -> Int {…}
func row(at indexPath: IndexPath) -> BaseRow {…}
self.bindModel = fruit
basicRows.append(StringRow(title: “Name”,
icon: “”,
kvcKey: “name”,
value: fruit.name ?? “”,
placeholder: nil,
validator: nil))
// Row are type safe
basicRows.append(DoubleRow(title: “Price”,
icon: “”,
kvcKey: “price”,
value: fruit.price,
placeholder: “”,
validator: nil))
// You can build as many rows as you want
basicRows.append(TextViewRow(title: “Note”,
kvcKey: “note”,
value: fruit.note ?? “-“))
- }
}
Showing FormDataSource in a UITableView
                                                class FruitFormVC: UIViewController {

private let dataSource: FruitFormData

}
extension FruitFormVC: UITableViewDataSource {

func numberOfSections(in tableView: UITableView) -> Int {

return dataSource.numberOfSections()

}
func tableView(_ tableView: UITableView, numberOfRowsInSection section: Int) -> Int {

dataSource.numberOfRows(at: section)

}
func tableView(_ tableView: UITableView, cellForRowAt indexPath: IndexPath) -> UITableViewCell {
let row = dataSource.row(at: indexPath)

row.baseCell.setup(row)

row.baseCell.delegate = self

return row.baseCell

}

}
Listening to Cell Value Change
                                                extension FruitFormVC: FormCellDelegate {

func cellDidChangeValue(_ cell: UITableViewCell, value: Any?) {

let indexPath = tableView.indexPath(for: cell)!

_ = dataSource.updateItem(at: indexPath, value: value)

}

}
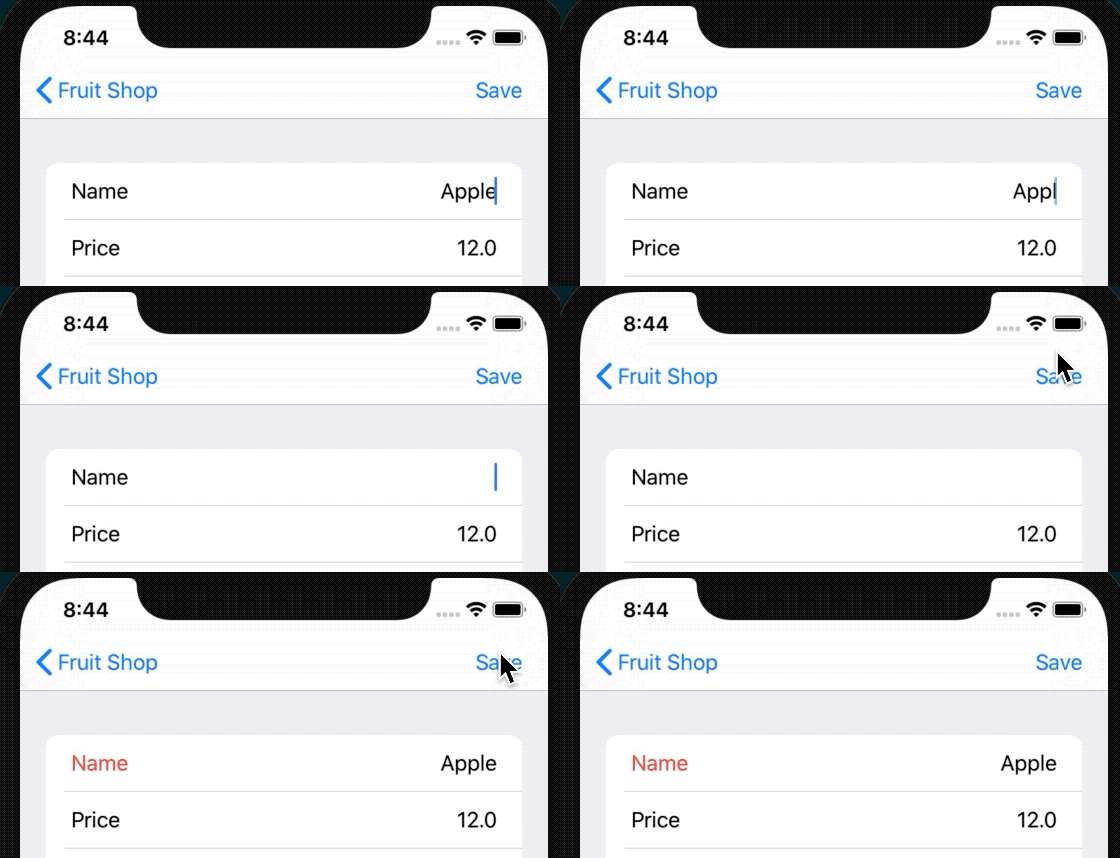
Data Validation
By providing a validation block when building a row, you can provide any validaiton rules.

                                                basicRows.append(StringRow(title: “Name”,

icon: “”,

kvcKey: “name”,

value: fruit.name ?? “”,

placeholder: nil,

validator: {

// Custom rules for row validation

return !(fruit.name?.isEmpty ?? true)
}))
                                                @objc private func saveButtonTapped() {

guard dataSource.validateData() else {

tableView.reloadData()

return

}
navigationController?.popViewController(animated: true)

}
Row Type Safety
Since a form row use key-value-coding to update its bind model, it is important to keep the row value type the same as the object’s variable type. ObjectForm enforces type safe. Every row must implement the following method:
open override func isValueMatchRowType(value: Any) -> Bool
This is already implemented by built-in generic rows, for example, TypedRow<T> and SelectRow<T>.
Make Your Own Row
Making your own row and cell is easy. You have 2 options:
- Create concrete type using
TypedRow
typealias StringRow = TypedRow<String>
- Subclass
BaseRow
                                                class TextViewRow: BaseRow {
public override var baseCell: FormInputCell {

return cell

}
public override var baseValue: CustomStringConvertible? {

get { return value }

set { value = newValue as? String }

}
var value: String?
var cell: TextViewInputCell
open override func isValueMatchRowType(value: Any) -> Bool {

let t = type(of: value)

return String.self == t

}
override var description: String {

return “<TextViewRow> \(title ?? “”)”

}
required init(title: String, kvcKey: String, value: String?) {

self.cell = TextViewInputCell()
super.init()
self.title = title

self.kvcKey = kvcKey

self.value = value

self.placeholder = nil

}

}
Do not subclass built-in rows and cells (indeed it is not possible because they are not open classes), because they are subject for change.
Instead, use them as a template to create your own version.
GitHub
- August 27, 2025
- SwiftUI
This package provides you with an easy way to show tooltips over any SwiftUI view, since Apple does not provide ...
- August 27, 2025
- SwiftUI
- Uncategorized
SimpleToast is a simple, lightweight, flexible and easy to use library to show toasts / popup notifications inside iOS or ...
- August 27, 2025
- SwiftUI
Create Toast Views with Minimal Effort in SwiftUI Using SSToastMessage. SSToastMessage enables you to effortlessly add toast notifications, alerts, and ...


