
- August 28, 2025
- Mins Read

Reactions is a fully customizable control to give people more ways to share their reaction in a quick and easy way.
Requirements
- iOS 8.0+
- Xcode 9.0+
- Swift 4.2+
Usage
Reaction
![]()
A Reaction object is a model defined with these properties:
- id: a unique identifier.
- title: the title displayed either in a selector or a button.
- color: the color used to display the button title.
- icon: the reaction icon.
- alternativeIcon: the optional alternative icon used with the reaction button.
The library already packages the standard Facebook reactions: like, love, haha, wow, sad and angry. And of course you can create your owns:
let myReaction = Reaction(id: “id”, title: “title”, color: .red, icon: UIImage(named: “name”)!)
ReactionSelector

The ReactionSelector control allows people to select a reaction amongst a list:
                                                let select = ReactionSelector()

select.reactions = Reaction.facebook.all
// React to reaction change

select.addTarget(self, action: #selector(reactionDidChanged), for: .valueChanged)
func reactionDidChanged(_ sender: AnyObject) {

print(select.selectedReaction)

}
// Conforming to the ReactionFeedbackDelegate

select.feedbackDelegate = self
func reactionFeedbackDidChanged(_ feedback: ReactionFeedback?) {

// .slideFingerAcross, .releaseToCancel, .tapToSelectAReaction

}
The component can be used alone (like above) or in conjunction with the ReactionButton (discussed later). You can of course customize the component using a ReactionSelectorConfig object:
                                                select.config = ReactionSelectorConfig {

$0.spacing = 6

$0.iconSize = 40

$0.stickyReaction = false

}
ReactionButton

A ReactionButton provides a simple way to toggle a reaction (e.g. like/unlike). A ReactionSelector can also be attached in order to display it when a long press is performed:
                                                let button = ReactionButton()

button.reaction = Reaction.facebook.like
// To attach a selector

button.reactionSelector = ReactionSelector()
You can configure the component using a ReactionButtonConfig object:
                                                button.config = ReactionButtonConfig() {

$0.iconMarging = 8

$0.spacing = 4

$0.font = UIFont(name: “HelveticaNeue”, size: 14)

$0.neutralTintColor = UIColor(red: 0.47, green: 0.47, blue: 0.47, alpha: 1)

$0.alignment = .left

}
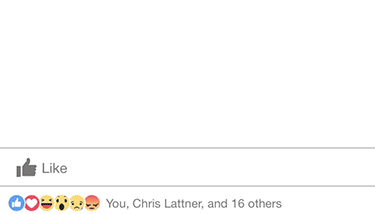
ReactionSummary

The ReactionSummary is a control which display a given reaction list as a set of unique icons superimposed. You can also link it to a text description.
                                                let summary = ReactionSummary()

summary.reactions = Reaction.facebook.all

summary.text = “You, Chris Lattner, and 16 others”
// As is a control you can also react to the .touchUpInside event

select.addTarget(self, action: #selector(summaryDidTouched), for: .touchUpInside)
![]()
You can also have the details for each reaction. For that you’ll need to uncombined them by setting the isAggregated config property to false.
                                                summary.config = ReactionSummaryConfig {

$0.isAggregated = false

}
Like the other components you can setting it using a ReactionSummaryConfig object:
                                                summary.config = ReactionSummaryConfig {

$0.spacing = 8

$0.iconMarging = 2

$0.font = UIFont(name: “HelveticaNeue”, size: 12)

$0.textColor = UIColor(red: 0.47, green: 0.47, blue: 0.47, alpha: 1)

$0.alignment = .left

$0.isAggregated = true

}
Installation
CocoaPods
Install CocoaPods if not already available:
                                                $ [sudo] gem install cocoapods

$ pod setup
Go to the directory of your Xcode project, and Create and Edit your Podfile and add Reactions:
                                                $ cd /path/to/MyProject

$ touch Podfile

$ edit Podfile

source ‘https://github.com/CocoaPods/Specs.git’

platform :ios, ‘8.0’
use_frameworks!

pod ‘Reactions’, ‘~> 3.0.0’
Install into your project:
$ pod install
Open your project in Xcode from the .xcworkspace file (not the usual project file):
$ open MyProject.xcworkspace
You can now import Reactions framework into your files.
Carthage
Carthage is a decentralized dependency manager that automates the process of adding frameworks to your Cocoa application.
You can install Carthage with Homebrew using the following command:
                                                $ brew update

$ brew install carthage
To integrate Reactions into your Xcode project using Carthage, specify it in your Cartfile file:
github “yannickl/Reactions” >= 3.0.0
Swift Package Manager
You can use The Swift Package Manager to install Reactions by adding the proper description to your Package.swift file:
                                                import PackageDescription
let package = Package(

name: “YOUR_PROJECT_NAME”,

targets: [],

dependencies: [

.Package(url: “https://github.com/yannickl/Reactions.git”, versions: “3.0.0” ..< Version.max)

]

)
Note that the Swift Package Manager is still in early design and development, for more information checkout its GitHub Page.
Manually
Download the project and copy the Sources and Resources folders into your project to use it in.
GitHub
#facebook #reactions #swift
YOU MIGHT ALSO LIKE...

- August 27, 2025
- SwiftUI
This package provides you with an easy way to show tooltips over any SwiftUI view, since Apple does not provide ...
- August 27, 2025
- SwiftUI
- Uncategorized
SimpleToast is a simple, lightweight, flexible and easy to use library to show toasts / popup notifications inside iOS or ...
- August 27, 2025
- SwiftUI
Create Toast Views with Minimal Effort in SwiftUI Using SSToastMessage. SSToastMessage enables you to effortlessly add toast notifications, alerts, and ...

- August 27, 2025
- Mins Read
- August 27, 2025
- Mins Read
- August 27, 2025
- Mins Read
- August 22, 2025
- Mins Read
