- August 28, 2025
- Mins Read
Description
RAImagePicker is a protocol-oriented framework that provides custom features from the built-in Image Picker Edit.

Overview
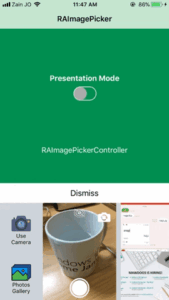
Object RAImagePickerController manages user interactions and delivers the results of those interactions to a delegate object.
RAImagePickerController depend on the configuration you set up before presenting it.
Functional Parts:
- Action Items(Default Asset.) – Supports two actions, this section is optional and by default contains action item for camera and photos.
- Camera – Camera’s output(Capture Videos/Photos), this section is optinal and by default it’s turned on.
- Asset. – Thumbnails of assets found in gallery, this section is mandatory and and can not be turned off.
Protocol Provide a delegate that conforms to RAImagePickerControllerDelegate protocol. Use delegate to get informed when user takes a picture or selects an asset from library and configure custom action and asset collection view cells.
Usage
Follow the following steps to get started:
- Add permissions to your
info.plistfile. - Create new instance of RAImagePickerController.
- Present the controller Note: You can configure the controller by set Custom Cells, change Appearance and Layout and the Capture Mode
Features
- Presentation Design Handeled for
.horizontal(like iMessage) and.verticalModes - Portrait and Landscape Supported
- Support iPhone X
- Support Live Photos
- Flip Camera (Rear/Front)
- Highly and Easly Customisable Layout
Plist Privacy Permissions
In order to get access to the user Camera and Photos/Videos Gallery, you will need to add permissions to the plist file :
- Privacy – Camera Usage Description (Photos/Videos)
- Privacy – Photo Library Usage Description (Gallery)
- Privacy – Microphone Usage Description (Videos)
                                                <key>NSCameraUsageDescription</key>

<string>Access Description</string>

<key>NSPhotoLibraryUsageDescription</key>

<string>Access Description</string>

<key>NSMicrophoneUsageDescription</key>

<string>Access Description</string>
Capture Modes
Currently it supports capturing Photos, Live Photos and Videos.
To configure RAImagePicker to support desired media type use captureSettings struct. Use property cameraMode to specify what kind of output you are interested in.
- photo [Support Photos Only (Default)]
- video [Support Videos Only]
- photoAndLivePhoto [Support Photos & Live Photos]
- photoAndVideo [Support Videos & Photos]
                                                Example:
let imagePicker = RAImagePickerController() imagePicker.captureSettings.cameraMode = .photoAndLivePhoto
To save the captured photos to the gallery. Set the flag savesCapturedPhotosToPhotoLibrary to true.
                                                Example:

let imagePicker = RAImagePickerController()
imagePicker.captureSettings.savesCapturedPhotosToPhotoLibrary = true
Fetching
Default Image Picker fetches from Photo Library 1000 photos and videos from smart album smartAlbumUserLibrary that should represent Camera Roll album. If you wish to provide your own fetch result please implement image picker controller’s assetsFetchResultBlock block.
For example the following code snippet can fetch only live photos:
                                                let imagePicker = RAImagePickerController()

imagePicker.assetsFetchResultBlock = {

guard let livePhotosCollection = PHAssetCollection.fetchAssetCollections(with: .smartAlbum, subtype: .smartAlbumLivePhotos, options: nil).firstObject else {

return nil //you can return nil if you did not find desired fetch result, default fetch result will be used.

}

return PHAsset.fetchAssets(in: livePhotosCollection, options: nil)

}
Reference Photos Framework.
Customization

Action Cells
1. Set Layout Configuration
                                                let imagePicker = RAImagePickerController()

imagePicker.layoutConfiguration.showsDefaultCameraItem = true

imagePicker.layoutConfiguration.showsDefaultGalleryItem = true
- Register Action Cells Now there’s multiple ways to register your custom cells
- Using nib
imagePicker.registerNibForActionItems(CustomNib)
- Using class
imagePicker.registerCellClassForActionItems(CustomCell)
- For specific item(nib)
imagePicker.cellRegistrator.register(nib: CustomNib, forActionItemAt: 0)
- For specific item(class)
imagePicker.cellRegistrator.register(nib: CustomCell, forActionItemAt: 0)
Please note, that RACellRegistrator provides a method to register one cell or nib for any asset media type.
- Configure Delegate
                                                func imagePicker(controller: RAImagePickerController, willDisplayActionItem cell: UICollectionViewCell, at index: Int) {

switch cell {

case let customCell as CustomCell:

switch index {

case 0:

customCell.title.text = “Title”

customCell.icon.image = UIImage(named: “icon_name”)

case 1:

customCell.title.text = “Title”

customCell.icon.image = UIImage(named: “icon_name”)

default: break

}

default:

break

}

}
- Handle Selected Assets
                                                func imagePicker(controller: RAImagePickerController, didSelectActionItemAt index: Int) {

print(“Selected Asset. Index: \(index)”)

}
Appearance Cells
- Register Cell Classes
                                                let imagePicker = RAImagePickerController()

imagePicker.register(cellClass: CustomImageCell.self, forAssetItemOf: .image)

imagePicker.register(cellClass: CustomVideoCell.self, forAssetItemOf: .video)
Please note, that RACellRegistrator provides a method to register one cell or nib for any asset media type.
2. Configure Delegate
                                                func imagePicker(controller: RAImagePickerController, willDisplayAssetItem cell: RAImagePickerAssetCell, asset: PHAsset) {

switch cell {

case let imageCell as CustomImageCell:

if asset.mediaSubtypes.contains(.photoLive) {

imageCell.subtypeImageView.image = UIImage(named: “icon_name”)

}

else if asset.mediaSubtypes.contains(.photoPanorama) {

imageCell.subtypeImageView.image = UIImage(named: “icon_name”)

}

else if #available(iOS 10.2, *), asset.mediaSubtypes.contains(.photoDepthEffect) {

imageCell.subtypeImageView.image = UIImage(named: “icon_name”)

}

// etc …

case let videoCell as CustomVideoCell:

videoCell.label.text = asset.duration

default:

break

}

}
Presentation
                                                let imagePicker = RAImagePickerController()

navigationController.present(imagePicker, animated: true, completion: nil)
Example
To run the example project, clone the repo, and run pod install from the Example directory first.
References
Requirements
- Xcode +9.0
- iOS 10.0+
- Swift 4
Installation
RAImagePicker is available through CocoaPods. To install it, simply add the following line to your Podfile:
pod ‘RAImagePicker’
GitHub
- August 27, 2025
- SwiftUI
This package provides you with an easy way to show tooltips over any SwiftUI view, since Apple does not provide ...
- August 27, 2025
- SwiftUI
- Uncategorized
SimpleToast is a simple, lightweight, flexible and easy to use library to show toasts / popup notifications inside iOS or ...
- August 27, 2025
- SwiftUI
Create Toast Views with Minimal Effort in SwiftUI Using SSToastMessage. SSToastMessage enables you to effortlessly add toast notifications, alerts, and ...


