- August 28, 2025
- Mins Read
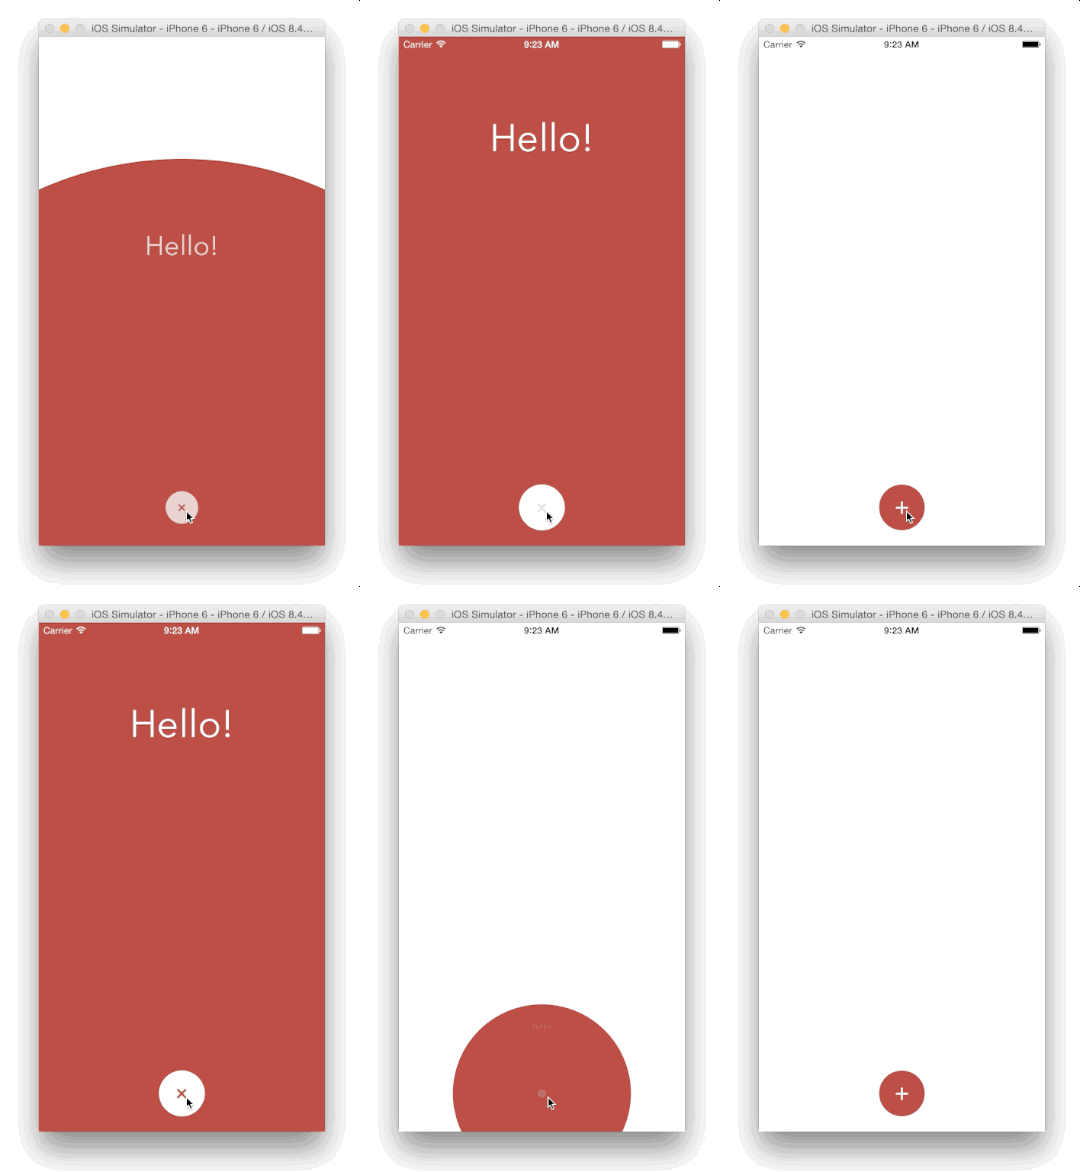
A custom modal transition that presents and dismiss a controller inside an expanding and shrinking bubble.
Screenshot
Usage
Install through CocoaPods:
                                                pod ‘BubbleTransition’, ‘~> 3.2.0’
use_frameworks!
Install through Carthage:
github “andreamazz/BubbleTransition”
Install through Swift Package Manager:
To integrate using Xcode:
File -> Swift Packages -> Add Package Dependency...
Enter package URL: https://github.com/andreamazz/BubbleTransition, and select the latest release.
Setup
Have your view controller conform to UIViewControllerTransitioningDelegate. Set the transitionMode, the startingPoint, the bubbleColor and the duration.
                                                let transition = BubbleTransition()
public override func prepare(for segue: UIStoryboardSegue, sender: Any?) {

let controller = segue.destination

controller.transitioningDelegate = self

controller.modalPresentationCapturesStatusBarAppearance = true

controller.modalPresentationStyle = .custom

}
// MARK: UIViewControllerTransitioningDelegate
public func animationController(forPresented presented: UIViewController, presenting: UIViewController, source: UIViewController) -> UIViewControllerAnimatedTransitioning? {

transition.transitionMode = .present

transition.startingPoint = someButton.center

transition.bubbleColor = someButton.backgroundColor!

return transition

}
public func animationController(forDismissed dismissed: UIViewController) -> UIViewControllerAnimatedTransitioning? {

transition.transitionMode = .dismiss

transition.startingPoint = someButton.center

transition.bubbleColor = someButton.backgroundColor!

return transition

}
You can find the Objective-C equivalent here.
Swipe to dismiss
You can use an interactive gesture to dismiss the presented controller. To enable this gesture, prepare the interactive transition:
                                                let interactiveTransition = BubbleInteractiveTransition()
override func prepare(for segue: UIStoryboardSegue, sender: Any?) {

if let controller = segue.destination as? ModalViewController {

controller.transitioningDelegate = self

controller.modalPresentationStyle = .custom

controller.modalPresentationCapturesStatusBarAppearance = true

controller.interactiveTransition = interactiveTransition

interactiveTransition.attach(to: controller)

}

}
and implement interactionControllerForDismissal in your presenting controller:
                                                func interactionControllerForDismissal(using animator: UIViewControllerAnimatedTransitioning) -> UIViewControllerInteractiveTransitioning? {

return interactiveTransition

}
In the presented controller make sure to call finish() on the interactive gesture if you need to quickly dismiss from a button press instead. Check the sample code for more info.
You can decide the gesture threshold and the swipe direction:
                                                interactiveTransition.interactionThreshold = 0.5

interactionThreshold.swipeDirection = .up
Properties
var startingPoint = CGPointZero
The point that originates the bubble.
var duration = 0.5
The transition duration.
var transitionMode: BubbleTranisionMode = .present
The transition direction. Either .present, .dismiss or .pop.
var bubbleColor: UIColor = .white
The color of the bubble. Make sure that it matches the destination controller’s background color.
Checkout the sample project for the full implementation.
GitHub
- August 27, 2025
- SwiftUI
This package provides you with an easy way to show tooltips over any SwiftUI view, since Apple does not provide ...
- August 27, 2025
- SwiftUI
- Uncategorized
SimpleToast is a simple, lightweight, flexible and easy to use library to show toasts / popup notifications inside iOS or ...
- August 27, 2025
- SwiftUI
Create Toast Views with Minimal Effort in SwiftUI Using SSToastMessage. SSToastMessage enables you to effortlessly add toast notifications, alerts, and ...


