- August 28, 2025
- Mins Read
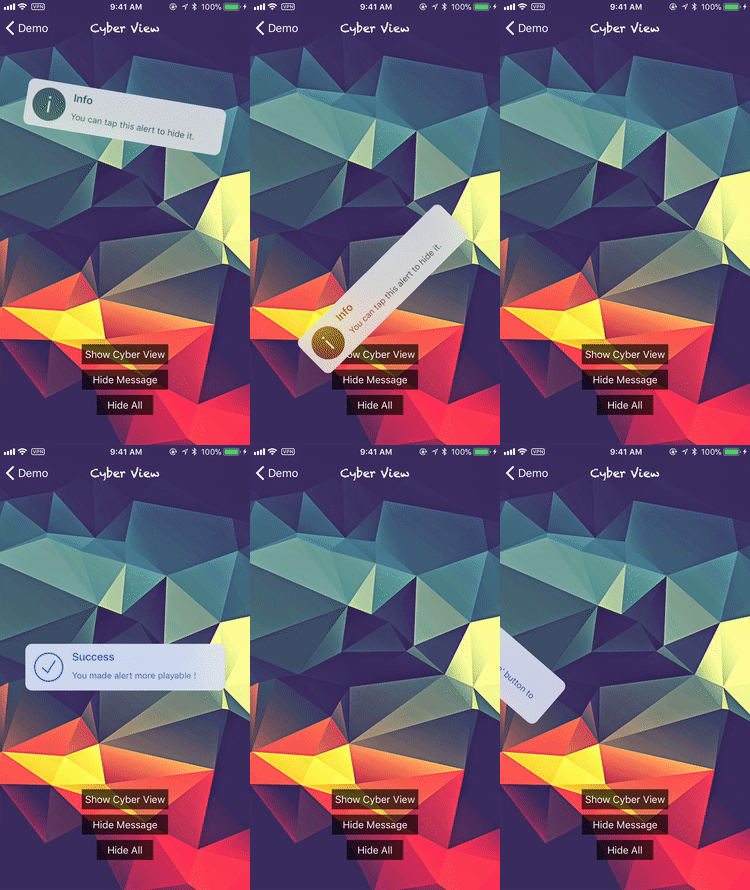
CFNotify is written in Swift. Using UIKit Dynamics as animator. It can make ANY UIView object draggable and throwable. This library mainly use for in-app notification and alerts. Let’s notice and alert your users in more playable and fun way !


Features
- Work with ANY
UIViewobject ! - Using UIKit Dynamics. Light and Smooth !
- Highly Customizable
- Included three ready to use views:
CyberView,ClassicView,ToastView - Simple to implement
Requirements
Swift 4.0+
Xcode 9
iOS 9.0+
Change Log
Please read CHANGELOG.md.
Installation
Carthage (Recommended)
Add the following lines into Cartfile
                                                #CFNotify

github “JT501/CFNotify”
-
Run
carthage updateand then add CFNotify.framework and CFResources.bundle into your project
Cocoapods
Add the following lines into Podfile
pod “CFNotify”
Getting Started
There is an example project inside the source code. You are suggested to have a look first and get familiar with this framework.
The Basics
This is the basic function with all default settings, design your own UIView or use CFNotifyView to create one easily.
CFNotify.present(view: UIView)
If you need more custom settings, create your own Config and use the following function.
CFNotify.present(config: Config, view: UIView)
if you want custom tap action, use the following function. (If you use tapHandler, it will override the default tap to hide action)
CFNotify.present(config: Config, view: UIView, tapHandler: (()->Void)?)
CFNotify will put all the views to be shown in queue (First In First Out). You can hide the view programmatically using the following functions.
                                                CFNotify.hide() // hide the current view
CFNotify.hideAll() // hide all the views in queue (Clear the queue)
CFNotifyView
You can create an alert view quickly and easily by using CFNotifyView class.
CFNotifyView included 3 views currently: Cyber, Classic, Toast.
Each style has 4 themes: Info, Success, Fail, Warning
Each theme has 2 styles: Light and Dark
Cyber

                                                // Use Pre-set theme

let cyberView = CFNotifyView.cyberWith(title: “Title”,

body: “Body”,

theme: .info(.light))
//More customizations

let customCyberView = CFNotifyView.cyberWith(titleFont: UIFont,

titleColor: UIColor,

bodyFont: UIFont,

bodyColor: UIColor,

backgroundColor: UIColor,

blurStyle: UIBlurEffectStyle)
Classic

                                                // Use Pre-set theme

let classicView = CFNotifyView.classicWith(title: “Title”,

body: “Body”,

theme: .success(.light))
//More customizations

let customClassicView = CFNotifyView.classicWith(titleFont: UIFont,

titleColor: UIColor,

bodyFont: UIFont,

bodyColor: UIColor,

backgroundColor: UIColor)
Toast

                                                // Use Pre-set theme

let toastView = CFNotifyView.toastWith(text: “Text”,

theme: .fail(.dark))
//More customizations

let customToastView = CFNotifyView.toastWith(text: String,

textFont: UIFont,

textColor: UIColor,

backgroundColor: UIColor)
Config
You can config CFNotify using Config class. Config class included lots of properties, the following three are the most common:
initPosition: where the view is bornappearPosition: where the view appear positionhideTime: the view will automatically hide afterhideTime(default is 3 sec)
Example:
                                                var classicViewConfig = CFNotify.Config()

classicViewConfig.initPosition = .top(.random) //the view is born at the top randomly out of the boundary of screen

classicViewConfig.appearPosition = .top //the view will appear at the top of screen

classicViewConfig.hideTime = .never //the view will never automatically hide
Delegate
CFNotify provides Delegate methods for some of common events. You need to conform to the CFNotifyDelegate.
                                                func cfNotifyDidAppear() {}
func cfNotifyStartDragging(atPoint: CGPoint) {}
func cfNotifyIsDragging(atPoint: CGPoint) {}
func cfNotifyEndDragging(atPoint: CGPoint) {}
func cfNotifyDidDisappear() {}
func cfNotifyIsTapped() {}
Bugs and issues
If you find any bugs or encounter some issues regard to this framework, please feel free to open a new issue in Issues page.
GitHub
- August 27, 2025
- SwiftUI
This package provides you with an easy way to show tooltips over any SwiftUI view, since Apple does not provide ...
- August 27, 2025
- SwiftUI
- Uncategorized
SimpleToast is a simple, lightweight, flexible and easy to use library to show toasts / popup notifications inside iOS or ...
- August 27, 2025
- SwiftUI
Create Toast Views with Minimal Effort in SwiftUI Using SSToastMessage. SSToastMessage enables you to effortlessly add toast notifications, alerts, and ...


