
- August 28, 2025
- Mins Read
PolioPager is the easiest way to use PagerTabStrip including search tab in iOS. Written in pure swift.
(日本語はこちら)
Comparison
SNKRS
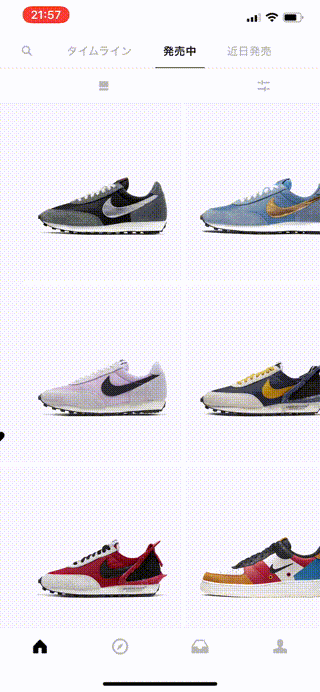
↓↓↓↓
PoiloPager
PolioPager enables us to use PagerTabStrip like SNKRS.
Installation
CocoaPods
You can use CocoaPods to install PolioPager by adding it to your Podfile:
pod ‘PolioPager’
To get the full benefits, import PolioPager
import PolioPager
Carthage
Create a Cartfile that lists the framework and run carthage update. Follow the instructions to add $(SRCROOT)/Carthage/Build/iOS/PolioPager.framework to an iOS project.
github “YuigaWada/PolioPager”
Swift Package Manager
Open Xcode and Select from menu to File > Swift Packages > Add Package Depende.
Manually
- Download and drop
PolioPagerin your project. - Congratulations!
Usage example
                                                import PolioPager
class ViewController: PolioPagerViewController {
override func viewDidLoad() {

super.viewDidLoad()

}
override func tabItems()-> [TabItem] {

return [TabItem(title: “Redbull”),TabItem(title: “Monster”),TabItem(title: “Caffeine Addiction”)]

}
override func viewControllers()-> [UIViewController]

{

let storyboard = UIStoryboard(name: “Main”, bundle: nil)
let viewController1 = storyboard.instantiateViewController(withIdentifier: “searchView”)

let viewController2 = storyboard.instantiateViewController(withIdentifier: “view1”)

let viewController3 = storyboard.instantiateViewController(withIdentifier: “view2”)

let viewController4 = storyboard.instantiateViewController(withIdentifier: “view3”)
return [viewController1, viewController2, viewController3, viewController4]

}

}
Usage
PolioPager is very simple.
First, you have to create a view controller that extends PolioPagerViewController
                                                class ViewController: PolioPagerViewController {

…

}
You need at least tabItems() and viewControllers().
Tab Items
You only have to prepare TabItem Structure and override tabItems() .
Widths of each tab are automatically calculated.
                                                override func tabItems()-> [TabItem] {

return [TabItem(title: “Redbull”),TabItem(title: “Monster”),TabItem(title: “Caffeine Addiction”)]

}
ViewControllers
Override viewControllers() .
                                                override func viewControllers()-> [UIViewController]

{

let storyboard = UIStoryboard(name: “Main”, bundle: nil)
let viewController1 = storyboard.instantiateViewController(withIdentifier: “searchView”)

let viewController2 = storyboard.instantiateViewController(withIdentifier: “view1”)
return [viewController1, viewController2]

}
In the above example, ViewControllers are prepared from storyboard.
For those who don’t know instantiateViewController , check below.
↓
TabItem structure
TabItem is defined as follow.
                                                public struct TabItem {

var title: String?

var image: UIImage?

var font: UIFont

var cellWidth: CGFloat?

var backgroundColor: UIColor

var normalColor:UIColor

var highlightedColor: UIColor
public init(title: String? = nil,

image: UIImage? = nil,

font:UIFont = .systemFont(ofSize: 15),

cellWidth: CGFloat? = nil,

backgroundColor: UIColor = .white,

normalColor: UIColor = .lightGray,

highlightedColor: UIColor = .black){
self.title = title

self.image = image

self.font = font

self.cellWidth = cellWidth

self.backgroundColor = backgroundColor

self.normalColor = normalColor

self.highlightedColor = highlightedColor
}

}
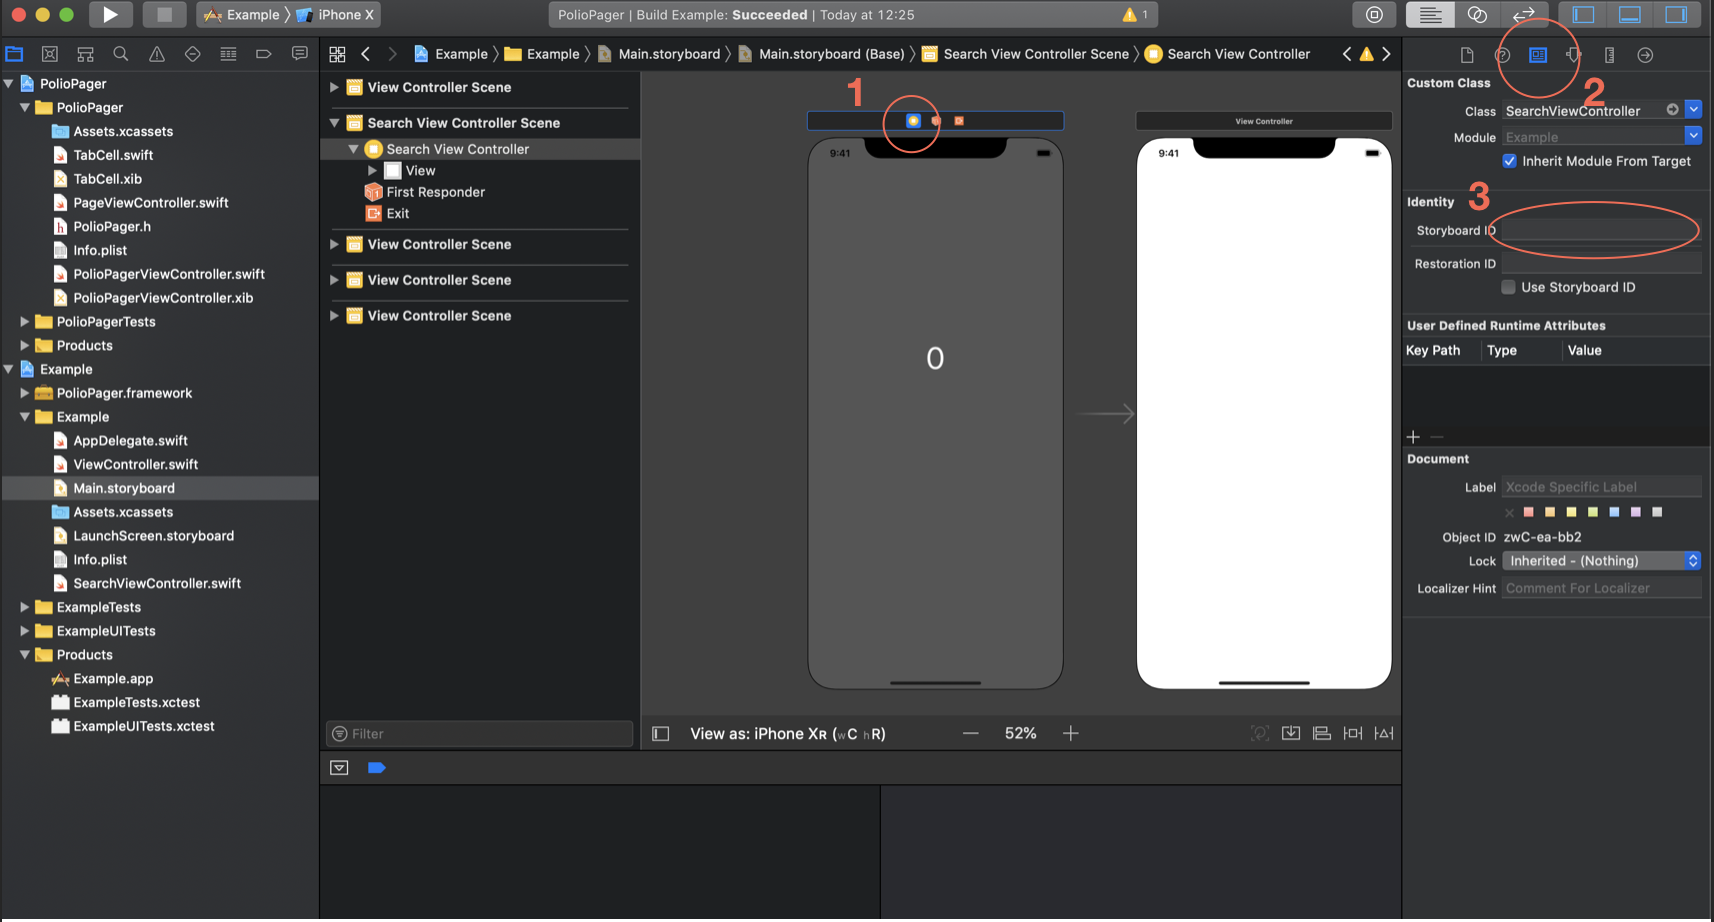
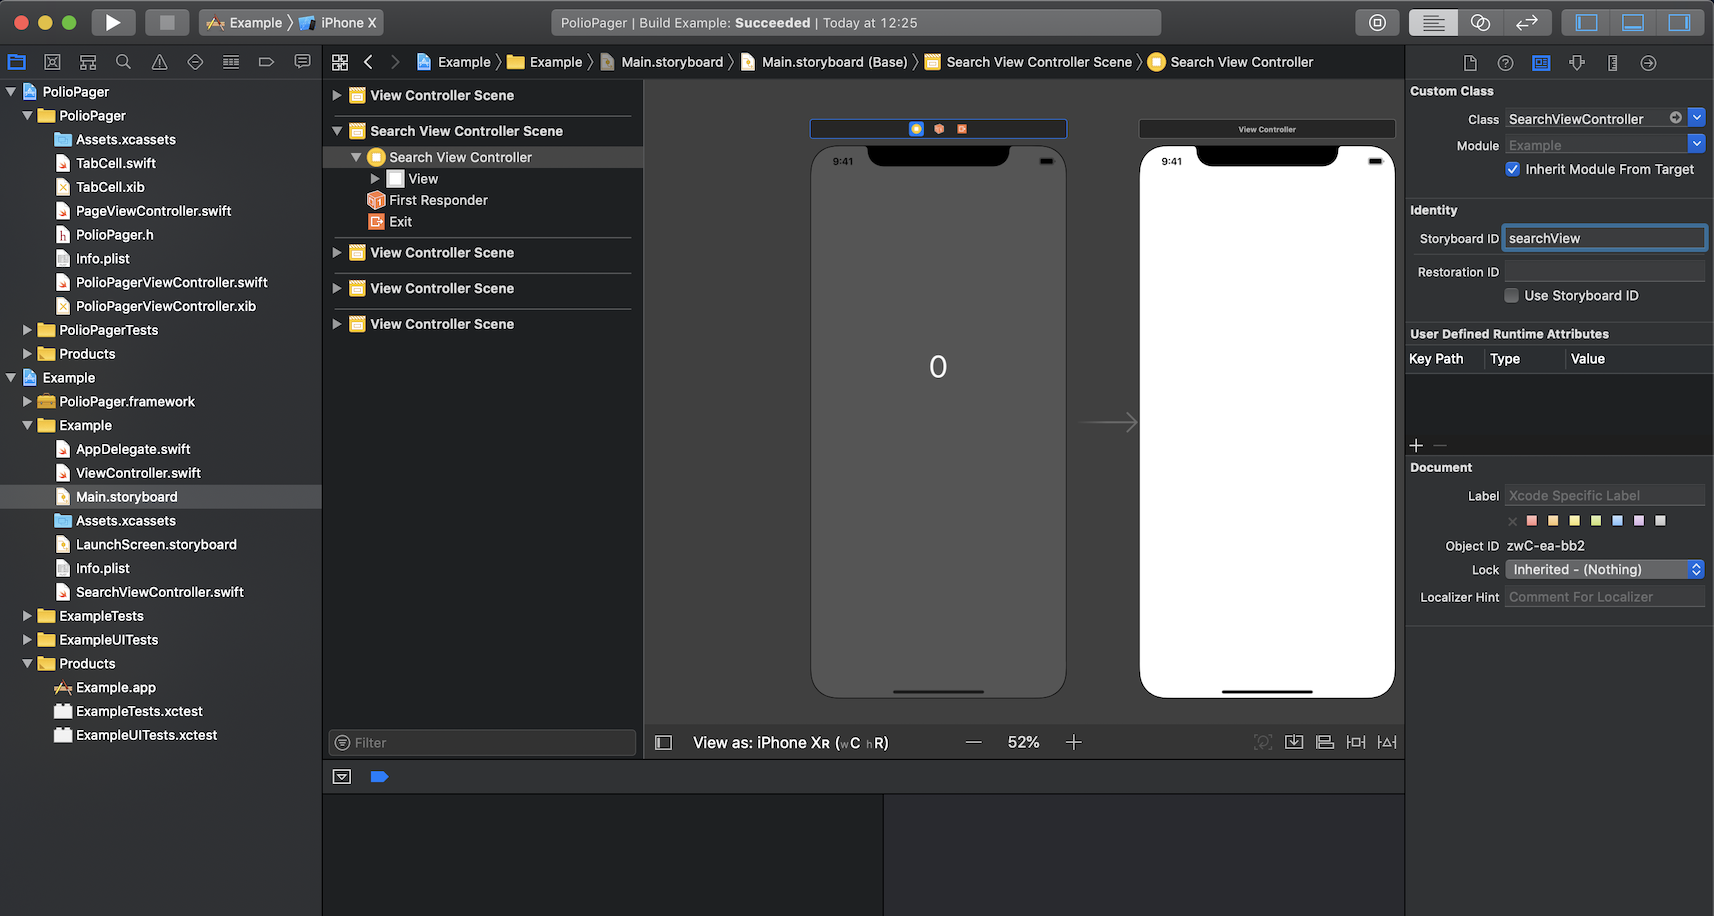
Search ViewController
To get input on TextFiled in Search ViewController, you have to adopt PolioPagerSearchTabDelegate protocol.
For example,
                                                import PolioPager
class SearchViewController: UIViewController, PolioPagerSearchTabDelegate, UITextFieldDelegate {
@IBOutlet weak var label: UILabel!
var searchBar: UIView!

var searchTextField: UITextField!

var cancelButton: UIButton!
override func viewDidLoad() {

super.viewDidLoad()
self.searchTextField.delegate = self

}
func textField(_ textField: UITextField, shouldChangeCharactersIn range: NSRange, replacementString string: String) -> Bool {

guard let text = textField.text else{ return true }
label.text = text

return true

}
}
Customization
Color & Frame & Duration
Check this.
                                                //color

public var tabBackgroundColor: UIColor = .white
//duration

public var barAnimationDuration: Double = 0.23
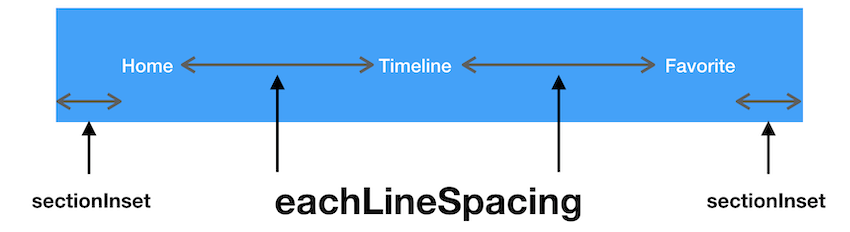
                                                public var eachLineSpacing: CGFloat = 5

public var sectionInset: UIEdgeInsets = UIEdgeInsets(top: 0, left: 20, bottom: 0, right: 10)
public var selectedBarHeight: CGFloat = 3
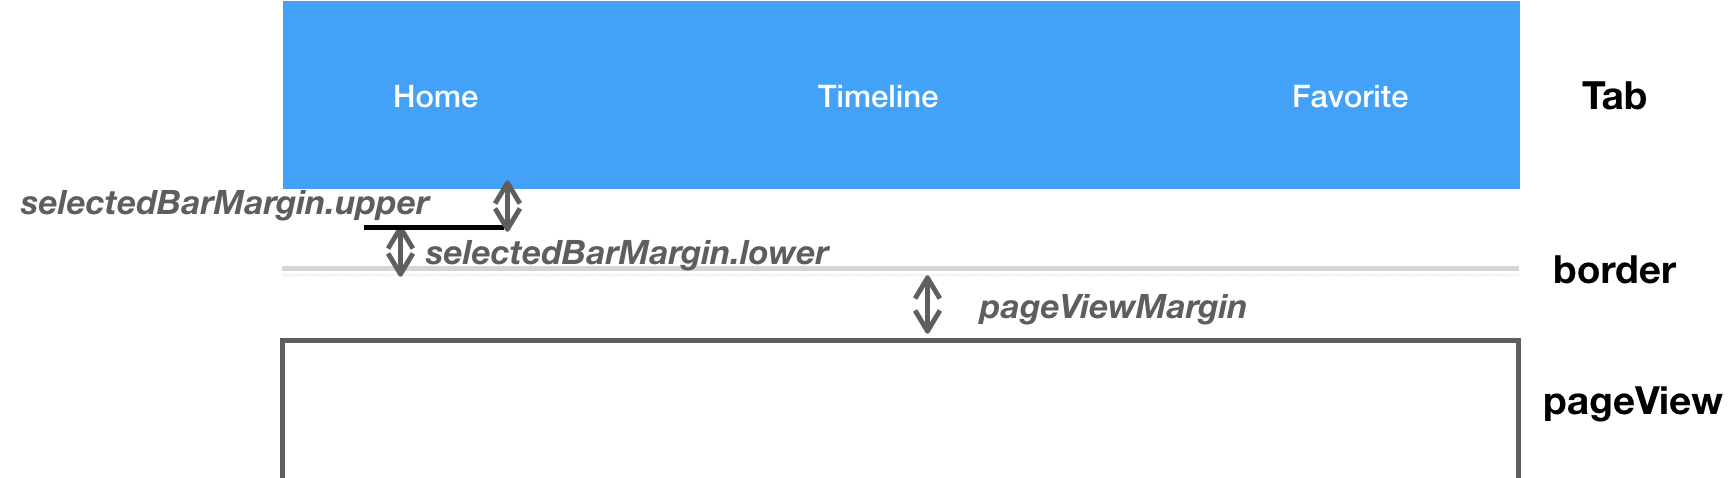
                                                //selectedBar

public var selectedBarMargins: (upper: CGFloat, lower: CGFloat) = (1, 2)
//pageView

public var pageViewMargin: CGFloat = 1
Border
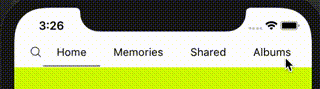
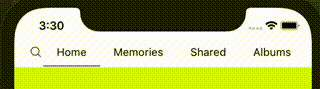
You can draw the border between Tab and pageView.
                                                public var needBorder: Bool

public var boderHeight: CGFloat = 1

public var borderColor: UIColor = .lightGray
Duration
public var barAnimationDuration: Double = 0.23 //Default.
public var barAnimationDuration: Double = 0.10
Others
You can also get these Components!
//MARK: open IBOutlet
@IBOutlet weak open var collectionView: UICollectionView!
@IBOutlet weak open var searchBar: UIView!
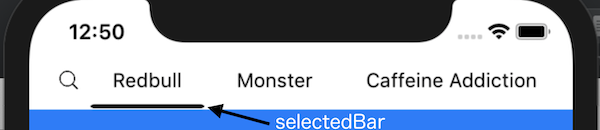
@IBOutlet weak open var selectedBar: UIView!
@IBOutlet weak open var pageView: UIView!
@IBOutlet weak open var searchTextField: UITextField!
@IBOutlet weak open var cancelButton: UIButton!
For Example, if you want to change the appearance of selectedBar,
                                                //PolioPagerViewController
override func viewDidLoad() {

self.selectedBarHeight = 2

self.selectedBar.layer.cornerRadius = 0

self.selectedBar.backgroundColor = .gray
super.viewDidLoad()

}
More
If you want to change the visible child view controller, use moveTo(index: Int)
                                                //PolioPagerViewController
moveTo(index: 1)

moveTo(index: nextIndex)

…
You can set initial index.
                                                class ViewController: PolioPagerViewController {
override func viewDidLoad() {

self.initialIndex = 1

…

}

}
GitHub
#animation #carthage #cocoapods #ioslibrary #iosui #pagercontroller #swift #tab #tabbar
YOU MIGHT ALSO LIKE...

- August 27, 2025
- SwiftUI
This package provides you with an easy way to show tooltips over any SwiftUI view, since Apple does not provide ...
- August 27, 2025
- SwiftUI
- Uncategorized
SimpleToast is a simple, lightweight, flexible and easy to use library to show toasts / popup notifications inside iOS or ...
- August 27, 2025
- SwiftUI
Create Toast Views with Minimal Effort in SwiftUI Using SSToastMessage. SSToastMessage enables you to effortlessly add toast notifications, alerts, and ...

- August 27, 2025
- Mins Read
- August 27, 2025
- Mins Read
- August 27, 2025
- Mins Read
- August 22, 2025
- Mins Read
