- August 28, 2025
- Mins Read
A protocol to enable UIViewControllers or UIViews to present placeholder views based on content, loading, error or empty states.
Overview
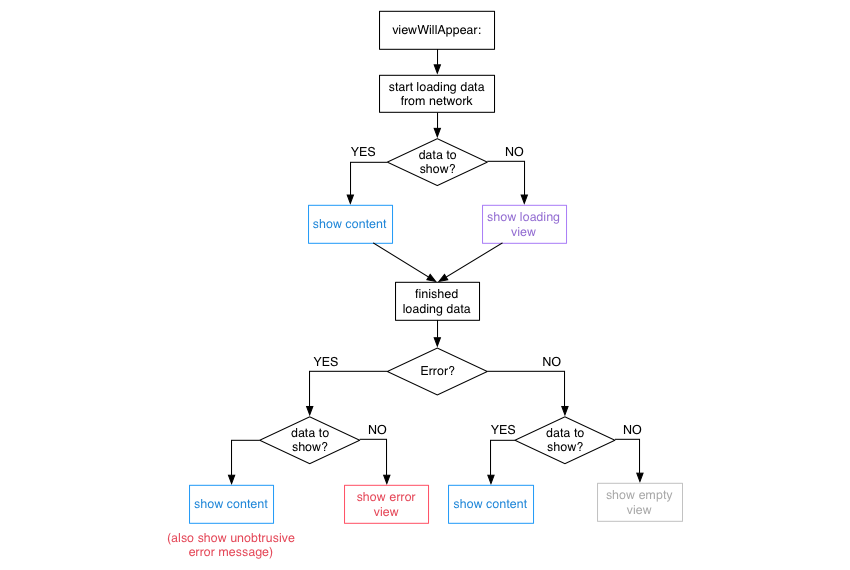
In a networked application a view controller or custom view typically has the following states that need to be communicated to the user:
- Loading: The content is currently loaded over the network.
- Content: The content is available and presented to the user.
- Empty: There is currently no content available to display.
- Error: An error occurred whilst downloading content.
As trivial as this flow may sound, there are a lot of cases that result in a rather large decision tree.

StatefulViewController is a concrete implementation of this particular decision tree. (If you want to create your own modified version, you might be interested in the state machine that is used to show and hide views.)
Version Compatibility
Current Swift compatibility breakdown:
| Swift Version | Framework Version |
|---|---|
| 3.0 | 3.x |
| 2.3 | 2.x |
| 2.2 | 1.x |
Usage
This guide describes the use of the StatefulViewController protocol on UIViewController. However, you can also adopt the StatefulViewController protocol on any UIViewController subclass, such as UITableViewController or UICollectionViewController, as well as your custom UIView subclasses.
First, make sure your view controller adopts to the StatefulViewController protocol.
                                                class MyViewController: UIViewController, StatefulViewController {

// …

}
Then, configure the loadingView, emptyView and errorView properties (provided by the StatefulViewController protocol) in viewDidLoad.
                                                override func viewDidLoad() {

super.viewDidLoad()
// Setup placeholder views

loadingView = // UIView

emptyView = // UIView

errorView = // UIView

}
In addition, call the setupInitialViewState() method in viewWillAppear: in order to setup the initial state of the controller.
                                                override func viewWillAppear(animated: Bool) {

super.viewWillAppear(animated)
setupInitialViewState()

}
After that, simply tell the view controller whenever content is loading and StatefulViewController will take care of showing and hiding the correct loading, error and empty view for you.
                                                override func viewWillAppear(animated: Bool) {

super.viewWillAppear(animated)
loadDeliciousWines()

}
func loadDeliciousWines() {

startLoading()
let url = NSURL(string: “http://example.com/api”)

let session = NSURLSession.sharedSession()

session.dataTaskWithURL(url) { (let data, let response, let error) in

endLoading(error: error)

}.resume()

}
Life cycle
StatefulViewController calls the hasContent method to check if there is any content to display. If you do not override this method in your own class, StatefulViewController will always assume that there is content to display.
                                                func hasContent() -> Bool {

return datasourceArray.count > 0

}
Optionally, you might also be interested to respond to an error even if content is already shown. StatefulViewController will not show its errorView in this case, because there is already content that can be shown.
To e.g. show a custom alert or other unobtrusive error message, use handleErrorWhenContentAvailable: to manually present the error to the user.
                                                func handleErrorWhenContentAvailable(error: ErrorType) {

let alertController = UIAlertController(title: “Ooops”, message: “Something went wrong.”, preferredStyle: .Alert)

alertController.addAction(UIAlertAction(title: “OK”, style: .Default, handler: nil))

presentViewController(alertController, animated: true, completion: nil)

}
Custom Placeholder View insets
Per default, StatefulViewController presents all configured placeholder views fullscreen (i.e. with 0 insets from top, bottom, left & right from the superview). In case a placeholder view should have custom insets the configured placeholderview may conform to the StatefulPlaceholderView protocol and override the placeholderViewInsets method to return custom edge insets.
                                                class MyPlaceholderView: UIView, StatefulPlaceholderView {

func placeholderViewInsets() -> UIEdgeInsets {

return UIEdgeInsets(top: 20, left: 20, bottom: 20, right: 20)

}

}
View State Machine
Note: The following section is only intended for those, who want to create a stateful controller that differs from the flow described above.
You can also use the underlying view state machine to create a similar implementation for your custom flow of showing/hiding views.
                                                let stateMachine = ViewStateMachine(view: view)
// Add states

stateMachine[“loading”] = loadingView

stateMachine[“other”] = otherView
// Transition to state

stateMachine.transitionToState(.View(“loading”), animated: true) {

println(“finished switching to loading view”)

}
// Hide all views

stateMachine.transitionToState(.None, animated: true) {

println(“all views hidden now”)

}
Installation
Carthage
Add the following line to your Cartfile.
github “aschuch/StatefulViewController” ~> 3.0
Then run carthage update.
CocoaPods
Add the following line to your Podfile.
pod “StatefulViewController”, “~> 3.0”
Then run pod install with CocoaPods 0.36 or newer.
Manually
Just drag and drop the two .swift files in the StatefulViewController folder into your project.
Tests
Open the Xcode project and press ⌘-U to run the tests.
Alternatively, all tests can be run from the terminal using xctool.
xctool -scheme StatefulViewControllerTests -sdk iphonesimulator test
GitHub
- August 27, 2025
- SwiftUI
This package provides you with an easy way to show tooltips over any SwiftUI view, since Apple does not provide ...
- August 27, 2025
- SwiftUI
- Uncategorized
SimpleToast is a simple, lightweight, flexible and easy to use library to show toasts / popup notifications inside iOS or ...
- August 27, 2025
- SwiftUI
Create Toast Views with Minimal Effort in SwiftUI Using SSToastMessage. SSToastMessage enables you to effortlessly add toast notifications, alerts, and ...


