- August 28, 2025
- Mins Read
SwiftyFORM is a lightweight iOS framework for creating forms
Because form code is hard to write, hard to read, hard to reason about. Has a slow turn around time. Is painful to maintain.
Requirements
- iOS 12+
- Xcode 12+
- Swift 5.1+
Features
- Several form items, such as textfield, buttons, sliders
- Some form items can expand/collapse, such as datepicker, pickerview
- You can create your own custom form items
-
Align textfields across multiple rows
- Form validation rule engine
- Shows with red text where there are problems with validation
- Strongly Typed
- Pure Swift
- No 3rd party dependencies
USAGE
Tutorial 0 – Static text
                                                import SwiftyFORM

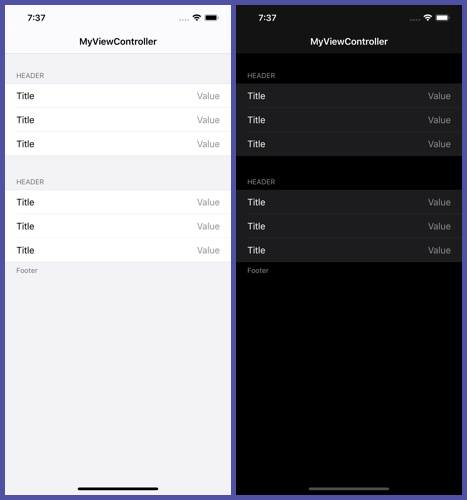
class MyViewController: FormViewController {

override func populate(_ builder: FormBuilder) {

builder += StaticTextFormItem().title(“Hello”).value(“World”)

}

}
                                                import SwiftyFORM

class MyViewController: FormViewController {

override func populate(_ builder: FormBuilder) {

builder += TextFieldFormItem().title(“Email”).placeholder(“Please specify”).keyboardType(.emailAddress)

}

}
Tutorial 2 – Open child view controller
                                                import SwiftyFORM

class MyViewController: FormViewController {

override func populate(_ builder: FormBuilder) {

builder += ViewControllerFormItem().title(“Go to view controller”).viewController(FirstViewController.self)

}

}
Advanced – date picker
                                                class DatePickerBindingViewController: FormViewController {

override func populate(_ builder: FormBuilder) {

builder += datePicker

builder += incrementButton

builder += decrementButton

builder += SectionFormItem()

builder += summary

updateSummary()

}
lazy var datePicker: DatePickerFormItem = {

let instance = DatePickerFormItem()

instance.title = “Date”

instance.datePickerMode = .date

instance.behavior = .expandedAlways

instance.valueDidChangeBlock = { [weak self] _ in

self?.updateSummary()

}

return instance

}()
lazy var incrementButton: ButtonFormItem = {

let instance = ButtonFormItem()

instance.title = “Next Day”

instance.action = { [weak self] in

self?.increment()

}

return instance

}()
lazy var decrementButton: ButtonFormItem = {

let instance = ButtonFormItem()

instance.title = “Previous Day”

instance.action = { [weak self] in

self?.decrement()

}

return instance

}()
lazy var summary: StaticTextFormItem = {

return StaticTextFormItem().title(“Date”).value(“-“)

}()
func updateSummary() {

summary.value = “\(datePicker.value)”

}
func offsetDate(_ date: Date, days: Int) -> Date {

var dateComponents = DateComponents()

dateComponents.day = days

let calendar = Calendar.current

guard let resultDate = calendar.date(byAdding: dateComponents, to: date) else {

return date

}

return resultDate

}
func increment() {

datePicker.setValue(offsetDate(datePicker.value, days: 1), animated: true)

updateSummary()

}
func decrement() {

datePicker.setValue(offsetDate(datePicker.value, days: -1), animated: true)

updateSummary()

}

}
Advanced – Validation

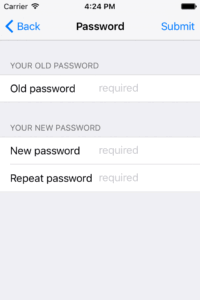
                                                class ChangePasswordViewController: FormViewController {

override func populate(_ builder: FormBuilder) {

builder.navigationTitle = “Password”

builder += SectionHeaderTitleFormItem().title(“Your Old Password”)

builder += passwordOld

builder += SectionHeaderTitleFormItem().title(“Your New Password”)

builder += passwordNew

builder += passwordNewRepeated

builder.alignLeft([passwordOld, passwordNew, passwordNewRepeated])

}
lazy var passwordOld: TextFieldFormItem = {

let instance = TextFieldFormItem()

instance.title(“Old password”).password().placeholder(“required”)

instance.keyboardType = .numberPad

instance.autocorrectionType = .no

instance.validate(CharacterSetSpecification.decimalDigitCharacterSet(), message: “Must be digits”)

instance.submitValidate(CountSpecification.min(4), message: “Length must be minimum 4 digits”)

instance.validate(CountSpecification.max(6), message: “Length must be maximum 6 digits”)

return instance

}()
lazy var passwordNew: TextFieldFormItem = {

let instance = TextFieldFormItem()

instance.title(“New password”).password().placeholder(“required”)

instance.keyboardType = .numberPad

instance.autocorrectionType = .no

instance.validate(CharacterSetSpecification.decimalDigitCharacterSet(), message: “Must be digits”)

instance.submitValidate(CountSpecification.min(4), message: “Length must be minimum 4 digits”)

instance.validate(CountSpecification.max(6), message: “Length must be maximum 6 digits”)

return instance

}()
lazy var passwordNewRepeated: TextFieldFormItem = {

let instance = TextFieldFormItem()

instance.title(“Repeat password”).password().placeholder(“required”)

instance.keyboardType = .numberPad

instance.autocorrectionType = .no

instance.validate(CharacterSetSpecification.decimalDigitCharacterSet(), message: “Must be digits”)

instance.submitValidate(CountSpecification.min(4), message: “Length must be minimum 4 digits”)

instance.validate(CountSpecification.max(6), message: “Length must be maximum 6 digits”)

return instance

}()

}
INSTALLATION
Swift Package Manager
With Swift Package Manager support in the latest Xcode, installation has never been easier.
Open your Xcode project -> File -> Swift Packages -> Add Package Dependency...
Search for SwiftyFORM and specify the version you want. The latest tagged release is usually a good idea.
CocoaPods
To integrate SwiftyFORM into your Xcode project using CocoaPods, specify the following in your Podfile:
                                                source ‘https://github.com/CocoaPods/Specs.git’

swift_version = ‘5.0’

platform :ios, ‘12.0’

use_frameworks!
target ‘MyApp’ do

pod ‘SwiftyFORM’, ‘~> 1.8’

end
Then, run the following command:
$ pod install
Carthage
Link to demo project that shows a minimal SwiftyFORM app using Carthage.
To integrate SwiftyFORM into your Xcode project using Carthage, specify it in your Cartfile:
github “neoneye/SwiftyFORM” ~> 1.8
Then, run the following command:
$ carthage update
Finally, add SwiftyFORM.framework (will be built by Carthage under Carthage/Build/iOS/) to your project’s Linked Frameworks and Libraries in the General tab, and add a new Run Script Build Phase:
- Set
/bin/bashas the shell - write
/usr/local/bin/carthage copy-frameworksin the script body - add
$(SRCROOT)/Carthage/Build/iOS/SwiftyFORM.frameworkto the input files
Manual
-
Open up Terminal application and cd into your iOS project directory
-
ONLY IF your project is not already initialized as a git repository, run
$ git init
- Add
SwiftyFORMas a submodule by running
$ git submodule add https://github.com/neoneye/SwiftyFORM.git
-
In the Project Navigator, select your application project and go to “Targets” -> “General”
-
Open the project folder and drag the
SwiftyFORM.xcodeprojfile into the “Frameworks, Libraries, and Embedded Content” tab of your application. -
Click the
+button under the “Frameworks, Libraries, and Embedded Content” section andAddtheSwiftyFORM.framework
GitHub
- August 27, 2025
- SwiftUI
This package provides you with an easy way to show tooltips over any SwiftUI view, since Apple does not provide ...
- August 27, 2025
- SwiftUI
- Uncategorized
SimpleToast is a simple, lightweight, flexible and easy to use library to show toasts / popup notifications inside iOS or ...
- August 27, 2025
- SwiftUI
Create Toast Views with Minimal Effort in SwiftUI Using SSToastMessage. SSToastMessage enables you to effortlessly add toast notifications, alerts, and ...


